
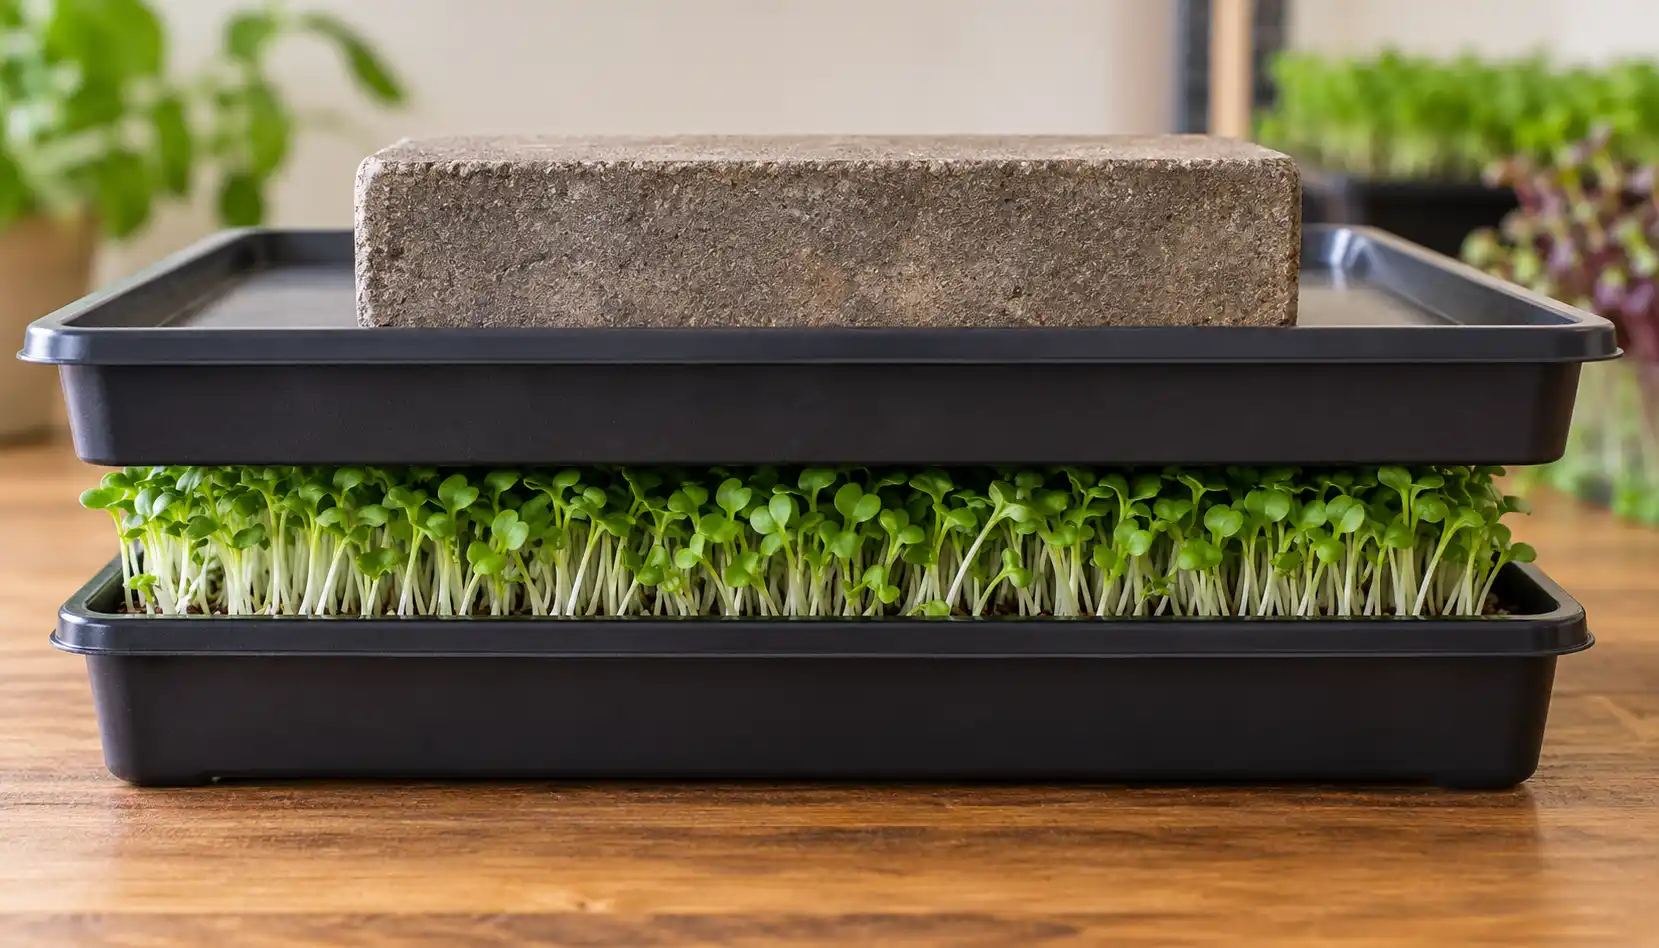
Weighting microgreens during germination can help produce stronger, more evenly established seedlings, but not every crop should be treated the same way.
Some microgreens benefit from being covered and weighted for the first few days after sowing. Others are better germinated under an unweighted blackout cover, and some crops benefit from a short blackout period after the weight has been removed.
What Does Weighting Microgreens Mean?
After sowing, a second tray is placed directly on top of the seed and growing medium. A weight is then placed in or on the upper tray.
Commercial growers often stack several planted trays together, with the weight placed on the top tray. This is commonly called stacking.
The pressure helps keep the seed in close contact with the moist growing medium while the roots begin to establish. It also gives the emerging roots resistance to push against, helping them penetrate the growing medium rather than lifting the seed away from it.
Why Weight Microgreens?
Seed ContactPressure keeps seed in close contact with the moist growing medium during germination.
Root EstablishmentResistance encourages emerging roots to anchor into the growing medium.
Even GerminationCovering the tray helps maintain a more consistent environment across the seed bed.
Seed HullsResistance can help some seedlings shed their seed hulls as they emerge.
Weighting vs Stacking vs Blackout
These terms are often used interchangeably, but they describe different parts of the growing process.
Weighting / Stacking
A tray sits directly against the seed with weight applied from above.
This combines darkness with physical pressure and is primarily used during germination and early root establishment.
Blackout
The seedlings are kept dark, but the cover is raised above them rather than pressing directly onto the crop.
This allows seedlings to continue growing upwards and can be used when additional stem length is desirable.
A crop can therefore go through both stages:
SowSow the seed evenly onto prepared, moist growing medium.
Weight / StackCover the seed and apply even pressure while germination begins.
Optional BlackoutRemove the pressure but continue excluding light if that crop benefits from additional stem length.
Move to LightExpose established seedlings to suitable light and continue growing to harvest.
Which Microgreens Should Be Weighted?
The following table provides practical starting points. Germination speed varies with seed lot, temperature, moisture and growing conditions, so use the number of days as a guide rather than an exact deadline.
| Microgreen | Weight / Stack | Extra Blackout | Notes |
|---|---|---|---|
| Broccoli | About 2–3 days | Usually no | Once well germinated and established, move into light. |
| Kale | About 2–4 days | Usually no | Treat similarly to other small-seeded brassicas. Avoid leaving heavily weighted after emergence. |
| Kohlrabi | About 2–3 days | Usually no | Generally establishes quickly and can then be moved into light. |
| Radish | About 2–3 days | Usually no | A vigorous, fast-germinating crop that generally responds well to stacking. |
| Pea Shoots | About 2–3 days | About 1–3 days | Strong seedlings tolerate weighting well. A subsequent blackout can provide additional stem length. |
| Sunflower | About 2–3 days | About 2–3 days | Weighting helps establish the strong root system. Check regularly as the seedlings develop. |
| Beetroot / Chard | About 4–5 days | Usually no separate stage | Slower to establish than brassicas. Germination can also be less uniform. |
| Amaranth | Light/moderate weighting, about 3–4 days | About 1–2 days | A fine-stemmed crop. Avoid excessive pressure and monitor moisture carefully. |
| Basil | Do not conventionally stack | About 4–7 days | Basil becomes mucilaginous when wet and is generally better germinated without a tray pressing directly onto the seed. |
| Rocket / Arugula | Usually not required | About 2–3 days | A blackout cover can be used without weighting the germinating seed. |
| Mustard | Depends on variety | Variety dependent | Some mustard varieties can be stacked, while mucilaginous types such as brown mustard are better treated differently. |
| Sorrel | Usually not stacked | Blackout commonly used | A slower, more delicate crop. Avoid treating it like peas, sunflower or radish. |
How Much Weight Should You Put on Microgreens?
There is no single correct weight for every tray.
The appropriate amount depends on the size of the tray, the crop being grown and how the trays are stacked. Large commercial 10 × 20 inch trays can tolerate considerably more total weight than small home-growing trays.
For Seedmart’s approximately 30 × 35 cm growing trays, a practical starting point is around 2–3 kg of evenly distributed weight for robust crops such as peas, sunflower and radish.
Use less pressure for fine-stemmed or more delicate crops.
How to Weight a Microgreen Tray
Prepare the MediumFill the tray with growing medium, level it and moisten it evenly.
Sow EvenlySpread the correct quantity of seed evenly across the surface.
CoverPlace another clean tray directly on top of the seed.
Add WeightApply an evenly distributed weight and keep the tray covered while germination begins.
If you are growing several trays at once, the trays themselves can be stacked. The weight is placed on the uppermost tray, while the trays above also contribute pressure to those below.
When Should You Remove the Weight?
Don’t remove the weight simply because a set number of hours has passed. Inspect the crop.
For many fast-growing varieties, the tray is ready to come out of the weighted stage once most of the seed has germinated, roots have begun anchoring into the medium and the seedlings are actively pushing the upper tray upwards.
At that point, either:
- move the tray into light, or
- replace the weighted tray with an inverted tray or blackout dome if the crop benefits from an additional blackout period.
Broccoli and radish will generally move directly into light. Peas and sunflower can benefit from additional unweighted darkness before lighting.
What Is a Blackout Period?
A blackout period keeps young microgreens in darkness after germination without continuing to press them down.
Without light, emerging seedlings continue searching upwards. This can produce additional stem length, which is useful for certain crops and can make harvesting easier.
Blackout should not be used simply because longer stems look impressive. Excessive darkness produces pale, stretched seedlings and delays photosynthesis.
Weighting = germination, seed contact and root establishment.
Blackout = controlled elongation after or during germination.
How to Blackout Microgreens
Once the weighted stage is complete, remove the tray pressing against the seedlings.
Place a clean tray upside down over the crop so there is room for the seedlings to grow upwards while remaining dark. A suitable blackout dome can also be used.
Check the crop regularly. Once it has reached sufficient height, remove the cover and move the tray into light.
Pea Microgreens: Weighting and Blackout
Peas are one of the best examples of a crop that can benefit from both stages.
After soaking and sowing, weight or stack the tray while the peas germinate and establish their roots. Around 2–3 days is a useful starting point.
Once the seedlings are actively lifting the upper tray, remove the pressure. An additional blackout period of approximately 1–3 days can then encourage useful stem length before the crop is exposed to light.
See our complete guide to growing pea microgreens.
Sunflower Microgreens: Weighting and Blackout
Sunflower also responds well to firm seed-to-medium contact. Its large seeds and vigorous seedlings make it much better suited to weighting than delicate microgreens.
Around 2–3 days of weighted germination followed by approximately 2–3 days of blackout is a useful starting point.
Do not leave the crop under pressure indefinitely. Once the roots have established and the seedlings are pushing strongly upwards, remove the weight.
See our guide to growing sunflower microgreens.
Broccoli, Kale and Radish
Fast-growing brassica microgreens generally require a simpler process.
After approximately 2–3 days of weighted germination — sometimes slightly longer depending on the crop and conditions — they can normally move directly into light once well germinated.
An extended blackout period is generally unnecessary.
See our guides to broccoli microgreens and radish microgreens.
What About Basil and Mucilaginous Seeds?
Some seeds develop a sticky or gel-like coating when wet. These are described as mucilaginous.
Basil is an important example. Conventional stacking can cause the wet seed to stick to the tray above and interfere with establishment.
These crops are generally better germinated under a suitable cover or blackout dome without heavy direct pressure.
Mustard requires some care because different mustard varieties behave differently. Avoid assuming that every mustard should receive the same treatment.
Weighting Microgreens in Australian Conditions
Temperature and humidity affect how quickly microgreens germinate and how long a covered tray can safely remain wet.
Australia spans tropical, subtropical, desert and temperate climatic regions, so the conditions inside a growing area can vary considerably between locations and seasons.
Warm & Humid Conditions
In humid tropical and subtropical conditions, covered trays can retain moisture for longer.
- Check trays regularly
- Do not overwater before stacking
- Avoid leaving germinated crops covered unnecessarily
- Introduce airflow once trays come out of blackout
Cooler Conditions
Germination can take longer in a cool growing area, so a fixed two-day schedule may not be sufficient.
- Judge the crop by germination progress
- Keep the medium moist but not saturated
- Allow additional germination time where necessary
- Watch for condensation under covers
Australia’s climate varies substantially: northern areas include hot, humid tropical conditions; Brisbane is subtropical; while Melbourne and Hobart have more distinct temperate seasons. Your actual growing-room temperature and humidity are more useful than your state or postcode when deciding how long to keep trays covered.
Watering During the Weighted Stage
The growing medium should be thoroughly and evenly moist when the tray is sown, but it should not be waterlogged.
Because the upper tray reduces evaporation, a weighted tray may retain moisture surprisingly well. Check rather than automatically adding water every day.
If the surface begins to dry before germination is complete, lightly mist as required. Once the crop is established and comes out of the weighted or blackout stage, you can transition towards bottom watering.
For more detail, see our guide to watering microgreens in Australian conditions.
Common Weighting and Blackout Problems
Tray Is Too Wet
A covered tray with saturated growing medium has limited opportunity to dry.
Reduce unnecessary watering and make sure the growing medium is moist rather than waterlogged.
Tray Is Drying Out
If germination is uneven, inspect the moisture level across the whole tray, particularly around the edges.
Lightly mist where necessary rather than flooding the tray.
Seedlings Are Flattened
The weight may be too heavy or may have been left on for too long.
Remove the pressure once seedlings are well established and actively lifting the covering tray.
Seedlings Are Too Tall and Pale
The blackout period has probably continued longer than necessary.
Move the crop into light and avoid extending blackout simply to maximise stem length.
Does Seeding Density Affect Weighting?
Yes. Seeding density affects airflow, moisture retention and how evenly seedlings emerge.
An excessively dense tray can remain wetter and develop a tightly packed canopy, while underseeding can produce an uneven crop that does not lift the upper tray consistently.
Use our Microgreen Seeding Density Chart for Australian Tray Sizes for crop-specific starting rates.
Frequently Asked Questions
Do all microgreens need to be weighted?
No. Many crops respond well to weighting, but others — particularly mucilaginous seeds such as basil — are better germinated without a tray pressing directly against the seed.
How long should I weight microgreens?
For many fast-growing crops, around 2–3 days is a useful starting point. Slower crops may require longer. Check germination and root establishment rather than relying only on the number of days.
How much weight should I use?
Weight should be appropriate to the tray size and crop. For a Seedmart 30 × 35 cm tray, around 2–3 kg is a reasonable starting point for robust crops. Use less pressure for delicate crops.
What can I use as a weight?
Use something clean, stable and evenly distributed. A paving brick, clean container filled with water or another suitable flat weight can work. Avoid unstable objects that concentrate all their weight in one small area.
Is blackout the same as weighting?
No. Weighting applies physical pressure to the germinating seed. Blackout excludes light while allowing seedlings room to grow upwards.
Do broccoli microgreens need blackout?
Broccoli generally benefits from a short weighted germination period but does not normally require an additional blackout stage before going into light.
Should pea microgreens be weighted?
Yes. Peas are robust and generally respond well to weighting during germination. They can then receive an additional short blackout period before going into light.
Should sunflower microgreens be weighted?
Yes. Sunflower is well suited to weighted germination. Once established, the crop can be moved into an unweighted blackout period before exposure to light.
Continue With the Microgreen Growing Guides
Grow Microgreens at Home or Commercially
Seedmart Australia supplies microgreen seeds in sizes ranging from home-growing packs through to bulk seed for commercial growers.